The Network Lifecycle
When it’s done right, design is a cycle, a continuous process of improvement. Network design is no exception.
- At a high level, the network design process follows these steps:
- Monitor, and improve
- Identify business requirements
- Compare the current network to the requirements
- Design the network at a high level, then in detail
- Deploy the network
A life-cycle model helps design, as it defines network needs. This helps remove some of the ‘guess-work’, bias, and assumptions. This also creates a baseline of how a network should perform and behave. Use this baseline to measure the success of the project, and to monitor network health.
Several ‘deliverables’ come out of the design process. These are documents, such as the high-level design, bill of materials, and so on. These are useful to map business needs against technical solutions. This also bridges the gap between technical and non-technical staff.
One of the most important deliverables to come out of the design process is the project plan. Use this to create a plan of tasks, milestones, and responsibilities. If the project is repeatable, such as with branch office networks, the plan is reusable.
A lifecycle design approach has several advantages. These include:
- Lower TCO – Planning eliminates guesswork. This enables you to use the right equipment for the job. This avoids the biggest (overkill) or cheapest (under-spec) equipment. This minimises redesigns, upgrades, and waste
- Availability and Performance – High availability in the network prevents costly downtime
- Business Agility – If you understand the business direction, the network can future-proofed. This prevents a reactive ‘ground-up’ redesign in the near-future
There are several different lifecycle models. This article will focus on the two Cisco have developed; PPDIOO and PBM.
Docker: Containers, Networking & Labs
A hands-on course from Network Direction
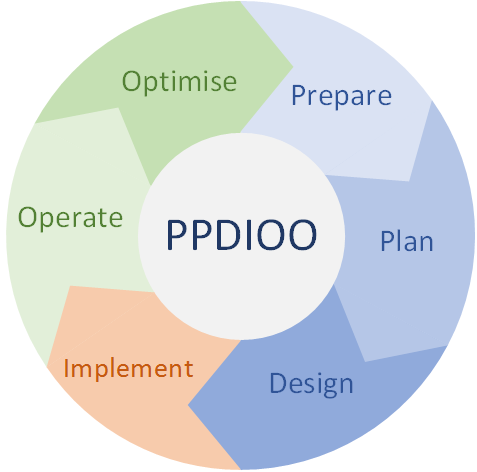
PPDIOO
PPDIOO is an acronym for Prepare, Plan, Design, Implement, Operate, Optimise.
- Prepare – Determine business goals, and create a High Level Design
- Plan – Identify network requirements, and perform a gap analysis
- Design – Create a detailed technical design
- Implement – Configure and deploy the network
- Operate – Perform day-to-day management
- Optimise – Proactive management and design improvements
Prepare
The prepare phase is about identifying business requirements and goals
The prepare phase collects business requirements. Then, use these requirements as the basis of a high-level design. A business case is then created to justify the project.
Step 1 – Business Requirements
Collect the business requirements. This includes immediate requirements, as well as the long-term vision and technology strategy.
It is important to understand business goals and strategy. This means having discussions with management about their plans for the business. For example, they may have a five-year plan to release a web-based application to the public. The business will need a data centre to host the application.
To understand immediate requirements, talk to the users. Try to understand what works for them and what doesn’t. An example might be WiFi coverage. Users may be able to tell you where they find black spots or areas with poor performance. Talking to users helps to remove any assumptions you may have.
Step 2 – High Level Design
Use the requirements and goals to develop a high-level architecture. This is a conceptual model of how the solution would work. There does not need to be much detail, if any.
This architecture may not include the entire end-game. Think about the five-year plan to release a web application. The high level design may be a data centre with internet links, routers and switches, and some servers. The design should be scalable, and put the network in a good position to start app development. Over time, the data centre can scale out with more servers, bigger links, and so on.
Step 3 – Financial Business Case
The financial business case document lists out the requirements for the network. It addresses how to solve challenges, and estimates a budget to complete the project. It is important to justify the project, by explaining how it will help the business. Include an outline of what would happen if the business were to do nothing, and the impact on the business.
It’s also good to include a few options. You may include the premium option to cover every need, and a cheap option to cover the basics. There could also be a ‘middle-ground’ option, which is likely to be the most popular. For each option, include risks and cost.
As the designer, this removes some risk and responsibility from you. It’s up to management and the finance team to approve or deny the project. You have outlined the project, and the risks involved. It’s up to management to decide what risk to accept.
Plan
The plan phase identifies technical requirements and required resources
During the planning phase, audit the current network, and compare to the high level design. This is the gap analysis. After completing this, create a project plan.
Step 1 – Assess the Current System
Audit the current network. Documentation should be helpful, but doesn’t always exist. Even when there is documentation, it may not be up to date.
Collect information such as the hardware and the software int he network. This includes version details and licenses. Document link sizes (WAN and internet), service providers, and costs. Measure the performance of the current network. Performance measurement may include discussions with users, around their perceptions and ‘pain-points’.
The information collected here provides a baseline. Use this later to compare how successful the project has been. The baseline is also used later to develop a test plan.
Step 2 – Create a Gap Analysis
A gap analysis measures the difference between the current and planned network. It is a map of ‘where we are’ and ‘where we want to be’. Compare this against best-practices for best results.
The gap analysis determines the detail around what needs to change in the network.
Step 3 – Create a Project Plan
The gap analysis finds the difference in the current state and the required state. Break this information into tasks, and add them into a project plan.
The project plan should include:
- Tasks – A list of what needs to be done
- Milestones – The tasks grouped into project phases
- Responsibilities – A list of who performs each task
- Financial Resources – The cost of each phase of the project. Financial teams like to spread the cost across a project when possible
Design
The design phase creates a detailed network design
Take the business goals, along with the technical requirements. Use this information to create a detailed design.
The detailed design needs to support:
- Availability
- Reliability
- Security
- Scalability
- Performance
This phase yields the detailed design document, and a bill of materials (BOM). The project plan is now updated with more detail.
The design, plan and BOM now needs approval by technical, management, and finance teams.
Implement
The Implementation phase moves the design into production
Use the detailed design to create an implementation plan. This is where the network moves into production.
Step 1 – Create an Implementation Plan
Use the project plan and the detailed design to create an implementation plan. This includes change management, maintenance windows, and notification of works to users.
Each step needs to include:
- Task description
- Detailed implementation guidelines
- Estimated time to implement
- Rollback steps
- Reference to design and other documents
Step 2 – Verify in the lab
If possible, start with a lab. This helps to find unexpected errors and resolve them before affecting users.
Step 3 – Implement a Pilot
Break a larger project into smaller deployments. For example, the project may be to upgrade firewalls at several branch sites.
When this is the case, start with a pilot deployment. In the example above, this means upgrading the firewall at one branch first. Then test if this is successful.
This will test if there are any issues in a real world environment. If there are serious issues, they will affect a group of users, rather than all users.
Step 4 – Full Deployment
After the lab and pilot irons out the bugs, move to the full scale deployment. on completion, compare it to the baseline created earlier. This will determine if the project has been successful. This also makes sure the project hasn’t had a negative effect on the network.
Operate
In the Operate phase, the network is in production, and is monitored and managed
The Operate phase is the longest phase of the lifecycle. This is the day-to-day operations of the network in production.
When this phase starts, create a new baseline. Use this later to test the performance of the network.
The day-to-day components to this phase are:
- Network health maintenance
- Detect faults in the network
- Performance monitoring. This can be Proactive and Reactive
- Capacity planning
- Minor moves, adds, and changes (MACs)
Optimise
In the Optimise phase, the design is proactively improved
The optimise phase is all about proactive management. This means identifying problems before they arise. This is another occasion when the performance baseline is useful.
This may identify needed network improvements. As an example, management may decide they want to install IP telephony.
This is where the lifecycle begins again. Identifying the need here leads back to the Prepare phase to start a new project.
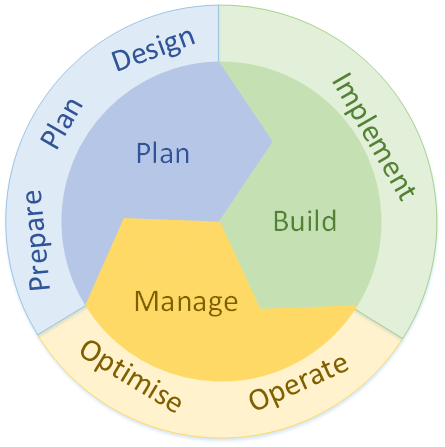
Plan, Build, Manage (PBM)
Cisco’s second lifecycle model is PBM. This was created as a simplified way to engage customers in their projects. The PPDIOO phases are still relevant, but they map to three simple phases.
This is easier for customer engagement. Different teams, companies, or consultants, can handle different sections of the project. For example:
- Consultant-A is designs the solution. This is the Plan section
- Internal IT is implements the solution. This is the Bulid section
- A managed services team operates the solution. This is the Manage section
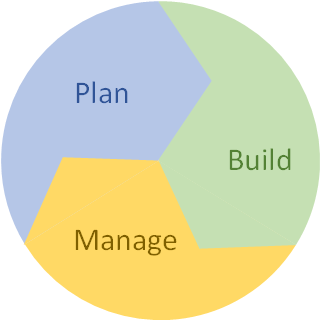
Plan
The plan section includes:
- Strategy and Analysis
- Assessment of the current network
- Design of the revised network
Build
The build section includes:
- Deployment of the new network
- Migration to the new network
- Validation of the new network
Manage
The manage section includes:
- Product Support
- Solution Support
- Optimization
- Operations Management
Mapping PBM to PPDIOO
As shown below, Each section still maps to PPDIOO. The teams in each PBM phase can refer to their relevant PPDIOO tasks.