
CML Installation
Overview
This brief guide will show you how to install CML2.1 in as a VMWare Virtual machine.
VMWare
First, you need to install a supported version of VMWare. These include:
- Player (v14+)
- Workstation (v14+)
- Fusion (v10+)
- ESXi (v6.5+)
We are going to use the latest version of VMWare Player 16 (AKA ‘VMWare Workstation Player’). This is free for non-commercial use.
Download CML 2.5
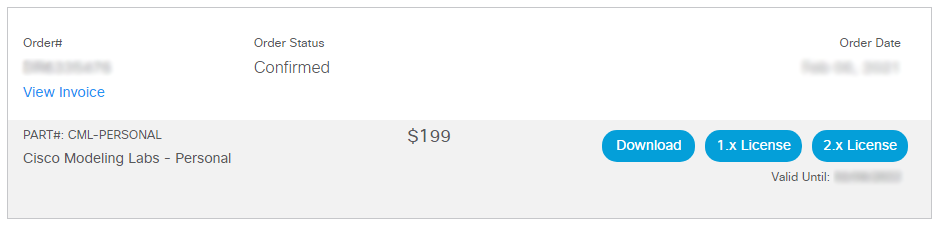
We’re assuming that you have paid for a copy of CML. Go to your Learning Store account, find your order, and click the Download button.
From there, you will be taken to Cisco’s download site. You may be required to log in again.
There are two components that you’re going to need:
- Controller OVA file (about 860MB)
- Reference Platform ISO file (about 10GB)
The controller OVA is the virtual machine image. This is the part that we will import into VMWare later.
The Reference Platform file (aka ‘refplat’) is the file that contains all the software images of the routers, switches, and servers.
At the time of writing, the refplat image is ‘March 2023’, and the OVA is 2.5.0. Download both of these files.

Configure the Virtual Machine
Import the OVA File
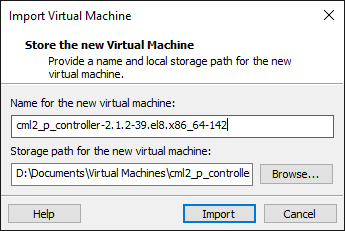
Double-click the OVA file, which will start the import wizard. This will require you to select a name.
During the wizard, you may be asked to download and install updated VMWare Tools. This is recommended
It is likely that the VM will boot automatically. If this happens, shut down the VM, as we have more configuration to do.
Configure VM Settings
Edit the VM settings, and configure them this way:
Memory
- 16GB is good, optionally add more
Processors
- Enable Virtualization
- Optionally, add more cores
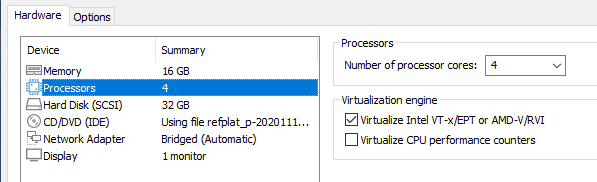
Hard Disk
- 32GB should be enough
- You can expand it if desired

CD/DVD
- Move the ‘refplat’ ISO to a suitable location (eg, with the VM disk files)
- Select the ISO image file
- Enable ‘Connect at power on’
Network
Network settings depend on your physical environment. Generally, leave the network as ‘bridged’. This is where the VM can get an IP from your DHCP server.
However, you may need to turn on NAT. This is where the VM shares an IP with your host.
Configure the Server
Start by powering on the VM. Eventually you will get a blue ncurses style (text-based) configuration wizard.
Follow the wizard through. Most options are self-explanatory.
Some brief notes to help you out:
- The ‘sysadmin’ account is used for configuring the system (eg, hardware, services, etc)
- The ‘admin’ account is used for creating network topologies
- The system administration console will be https://x.x.x.x:9090
- The regular system will be at https://x.x.x.x (using port 443)
- During the install, the software images are copied into the VM. After it is complete, the 10GB refplat ISO can be removed
Apply the License
Licensing can be covered in a few different ways, depending on the edition of CML that you’re using. In this guide, we’re assuming you’re using CML Personal.
Retrieve the Registration Token
Back on your account page of the Learning Network Store, click 2.x License.
A registration token will appear. Copy this token.
Apply the Registration Token
Open the CML console (https://x.x.x.x).
In the top-right corner, click Tools then Licensing.
Find the line that says Product Configuration. Next to that, click View/Edit. Make sure the version listed here matches the license you have.
Click Register.
Paste in the registration token, and click Register again.
Congratulations! You have deployed CML!