
Planning a Move to the Data Centre?
If you’ve never worked in a third-party data centre before, the first time can be a bit of a shock. There are a lot of rules and procedures to follow, and each data centre is a bit different from the last one.
If you’re going to deploy some new services in a data centre, this post is for you. The goal is to help make you aware of some factors you may not have considered yet. This will help make your first time in the data centre a smooth one.
Welcome to the Data Centre
Getting Access
The first step is getting access to the premises. Data centres are secure facilities, so can’t just walk in. First, your company needs to add you to the list of staff allowed to access the building. This usually involves logging onto the data centre’s portal and adding you as a user. Sometimes it means filling in some paperwork and emailing it to them.
There are a lot of safety and security procedures to follow, which requires an induction. There are usually two parts to this. One is an online induction, where you read their manual, and go through a short test. There may be a general and a site-specific test to go through. The second part is the onsite walkthrough. This is where one of the local staff show you where the emergency exits are, and so on.
Congratulations! You now have access to the facility! At this point, they will take your photo and give you some sort of access card. In some data centres, you are able to come and go as you please. In others, you have to sign in and out with security at every visit.
Do you want to bring some equipment in? You’ll need a ticket for that…
This part varies with each data centre. They need you to log a ticket for any work that they do. This includes performing work on your behalf and receiving deliveries.
The more strict data centres need tickets for everything. One that I go to needs a pre-arranged ticket number to get in the front door. Another one requires a ticket number to park your car in their carpark.
If you’re not sure, log a ticket. You don’t want to turn up and find that you can’t do your job because the paperwork’s not done.
Remote Work
It’s not uncommon for data centres to be a distance away. Sometimes another state, or even another country. In cases like this, it may be useful to get the data centre staff to do some of the physical work for you. This is useful if you need a hard disk replaced, a cable repatched, or a tape changed.
This is not generally a cheap option, especially if it’s an emergency request. But often it’s still cheaper and faster than getting on a plane and doing it yourself.
Oh, and you will definitely need to raise a ticket.
Inside the Building
Layout
When you get into the building, you will find data halls, provider rooms, and shared areas.
The data halls are where the rows of racks are. There are ‘hot’ and ‘cold’ aisles. Install your equipment so it pulls cold air from the cold aisle, with the exhaust facing the hot aisle.
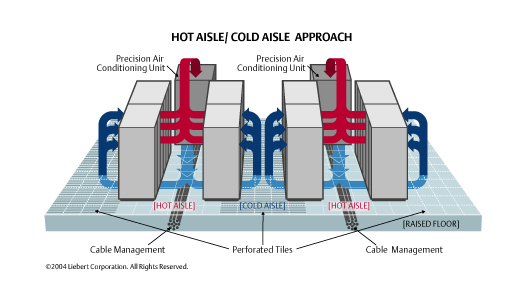
Some data centres are relaxed on this and don’t care which way the air flows in a practical sense. On the other end of the strictness scale, onsite staff may come and inspect your work at the end of the day.
Most data centres will need you to install ‘blanking plates’ in unused rack space, to keep the hot and cold aisles separate. One data centre I went to in Melbourne demanded brush plates for cables, and duct tape to seal any gaps. Blanking plates are usually provided for you to use.
There is one rule that all data centres have. No cardboard in the data halls. Cardboard can be a fire hazard, with all the hot equipment around. Also, fibres can get sucked into equipment and shorten the lifespan of equipment. If you need boxes for storage, bring your own plastic tubs.
Another rule for the data hall is no photography. This is for security, but if you’re only photographing your own racks, they usually don’t mind.
Service providers have their own areas separate to regular customers. I’ve heard these called ‘basements’ or ‘meet-me rooms’. When you arrange comms with your provider of choice, you connect to the equipment in these rooms. We’ll get to comms later.
Shared areas include provisioning rooms, delivery areas, and break rooms. These are self-explanatory. Use the provisioning rooms to unpack your equipment (no cardboard remember?) before you take it to your racks. Some provisioning rooms have racks to install your equipment in for configuration.
In some data centres, you need to book in the provisioning rooms. Do not leave this to the last minute. They often get booked out, and you have nowhere to unpack your kit. Honestly, I’ve never had success booking these rooms. Even when I do everything right, they double-book them, and I end up unpacking my boxes in the delivery area.
Racks
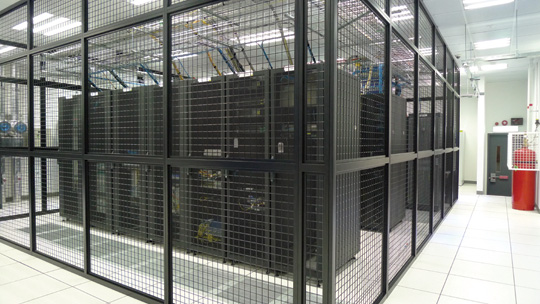
A good sized data centre will give you the option of using regular racks, or a cage. A cage, as the name suggests, an area that’s caged off from the rest of the data hall. This provides an extra layer of security, as you have to unlock the cage to get in. For the most part, they are just full of racks anyway, but you can put other things in there if you wish. I have even seen a desk in a cage.
Rack security varies between data centres. Some racks can be opened by a phone app or portal. Others need a physical key. Others need the data centre staff to unlock them for you. Generally, unless you provide your own racks in a cage, you don’t get a choice. It’s up to what the data centre provides. Personally, I prefer the kind that you can unlock remotely. This is useful if you need to give a third-party access to a specific rack, while you’re not present. Access to racks like this is usually logged too.
When you rent racks, you have to pay for power draw and cooling. Mostly, cooling matches the power draw, but some data centres manage this separately. Power draw is measured in kilowatts, or sometimes in ‘kVA’. As you would expect, the more devices, the higher the power draw, and the more you need to pay.
Racks will have two power rails, one on each side. These power rails are ‘A’ and ‘B’ feeds, which means that the power comes from different sources. The idea is that if the A-feed fails, the B-feed will still be ok. This also means that your devices should have dual power supplies.
Unfortunately, not all devices will have dual-power supplies. So, what then? This is when you want to get a Transfer Switch. This is a power device that connects to both power rails. Devices with single power supplies connect here and get the benefit of the dual power feeds.
As you’ve probably realised by now, the data centre provides your power. That generally means that you don’t need to provide your own UPS.
Cross Connects, Cabling and Comms
Inter-Rack Cabling
When it comes to running cables between racks, there are a few options. As you’ve probably guessed, this may depend on the data centre. Or, more specifically, it depends on the racks in the data centre.
Many racks have ‘punch out’ holes. This is where you can remove a plate from the rack, so you can run cables between racks. This is the easiest option but can lead to messy cabling. Messy cabling can also lead to reduced air-flow, reduced cooling, and higher risk of cabling issues.
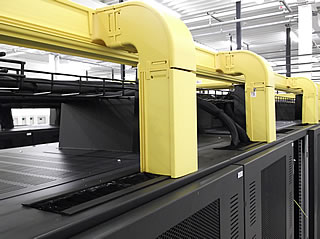
Some racks have solid sides on them, so punch-out holes are not an option. In this case, you may be able to use an overhead basket to run your cables. This ‘basket’ is a small mesh platform above the racks. You can run your cables out of the top of the rack, across the basket, and into another rack. Baskets are usually only available on request. Also, they only help if your racks are all together.
In the picture below, black cables coming out of the racks run across the basket. You can use whichever cables you want here.
If your racks aren’t together, you will need a cross-connect. This is what the yellow areas shown below are for.
Cross-Connects
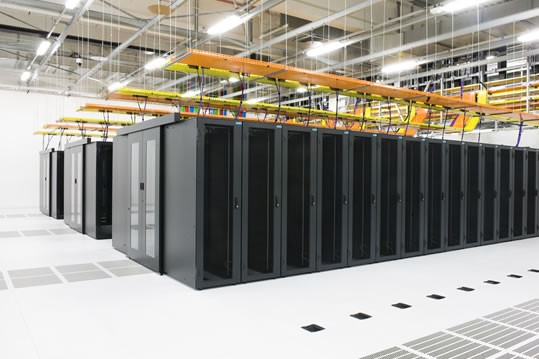
A cross-connect is where the data centre runs cables for you. If you look above your rack, you will see areas where cross-connects and other cabling is run. Generally, you won’t have any access to these yourself, unless you have a special license.
Cross-connects may use different types of cables. These are usually CAT6 copper, Single-Mode fibre, and Multi-Mode Fibre. The fibre may be single-core or dual-core. Remember to consider the length of the cable run before selecting your cabling type.
To get a cross-connect installed, first, you will need to get a patch panel or FOBOT installed at the top of your rack. This is where the cabling will terminate. Some data centres will also need you to install structured cabling. This is where they pre-provision 12-cores of fibre to their infrastructure. This is so they only need to access your rack once. When you order more cross-connects, they connect the new cross-connect to the existing structured cabling. Once all the cores are used, more structured cabling needs to be installed.
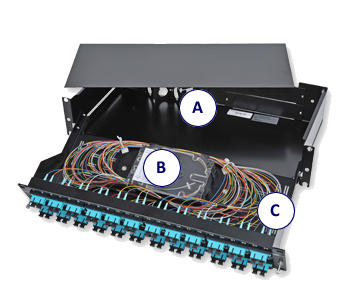
Watch for the type of fibre connectors that are installed in the FOBOT or patch panel. Some data centres use LC connectors, and some use SC connectors. You will need to make sure your patch leads have the matching connectors.
Cross-connects are usually ordered in the data centres portal. Here, you provide information for the ‘A’ end and the ‘B’ end. There is usually a one-time setup fee and an on-going monthly cost.
Provider Connections
Eventually, your racks will need access to the outside world. This means that you will need WAN or internet connections.
To go about this, you will need to talk to a provider and see if they also have a presence in the data centre. Then you can run a cross-connect to your provider, which they will connect to their switch. After that’s done, you can connect your router to the patch panel, and the rest is as normal.