
ASA Missing from Traceroute
You may have seen a case where an ASA does not appear in a traceroute. For example, consider the following topology:
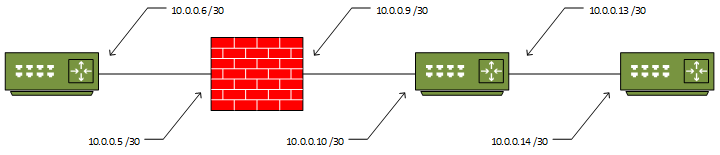
If you were to run a traceroute from R3 to R1, you would get this result:
R3#traceroute 10.0.0.6
Type escape sequence to abort.
Tracing the route to 10.0.0.6
VRF info: (vrf in name/id, vrf out name/id)
  1 10.0.0.13 7 msec 6 msec 8 msec
  2 10.0.0.6 4 msec *  14 msec
Notice that the trace is successful, but the ASA does not appear as a hop in the list? To explain why this happens, first consider how traceroute works.
When a traceroute is run, the initiating device will send either an ICMP packet or a UDP datagram (depending on implementation), with a Time-To-Live value of 1. This TTL is decremented by the first device, which causes it to send back an ICMP “Time Exceeded Message” (TEM). This is how the first IP in the traceroute list is obtained.
The sender then sends another packet/datagram, with the TTL set to 2. The second hop then sends the ICMP TEM, and the sender has the second device in the list. This process continues until the traceroute completes.
The ASA, being a security device, deliberately tries to ‘hide’ from the traceroute. It is able to do this, as it does not decrement the TTL of a packet or segment that passes through it. This means that it does not send back an ICMP TEM, and therefore does not appear in the traceroute list.
Traditional Configuration
The ASA can be configured to decrement the TTL. This is done by creating (or modifying) a class-map, and adding it to a policy map.
In this example, a new class-map is created, and attached to the global policy, to allow the ASA to appear on all traceroutes:
class-map traceroute
 match any
policy-map global_policy
 class traceroute
  set connection decrement-ttl
Once this has been added, the ASA now appears in the traceroute:
R3#trace 10.0.0.6
Type escape sequence to abort.
Tracing the route to 10.0.0.6
VRF info: (vrf in name/id, vrf out name/id)
  1 10.0.0.13 6 msec 8 msec 7 msec
  2 10.0.0.9 6 msec 6 msec  6 msec
  3 10.0.0.6 13 msec *  9 msec
Threat Defence Configuration
Configuration in FTD is a bit different, as this has to be done within Firepower Management Centre (FMC). At this time, FTD/FMC 6.2.0.1 is the latest version, and it does not natively support this configuration.
Fortunately, there is another option, called FlexConfig. FlexConfig use used in FMC to apply config that the ASA’s are capable of, but are not yet in the GUI.
To apply this configuration, start by creating a new FlexConfig Object:
- Navigate to Objects -> Object Management -> FlexConfig -> FlexConfig Object
- Click Add FlexConfig Object
- Enter a Name and Description
- Set the Deployment to Once and the Type to Append
- Add the commands below (make sure the indents are included)
- Save the object
policy-map global_policy
    class class-default
        set connection decrement-ttl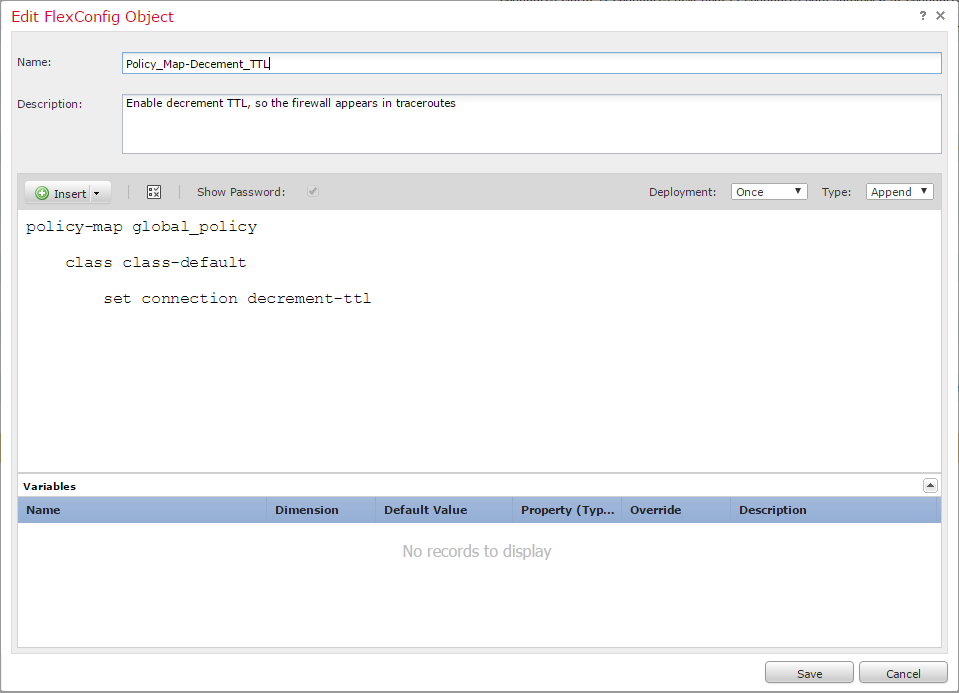
Next, create or edit a FlexConfig policy:
- Navigate to Devices -> FlexConfig
- Click New Policy or edit an existing one
- If this is a new policy, enter a Name, Description, and add the Devices that this policy will apply to
- Save the policy
Security
Keep in mind that while this may be useful for troubleshooting, it may not be ideal for security. Remember to consider whether this is the right option for your particular environment.
Another option would be to allow the ASA to appear in a traceroute coming from the inside, but not from the outside. This could be done by applying the class-map to a policy on an interface, rather than the global policy.