
ASA Privilege Levels
You may have had an occasion where a user wanted access to an ASA firewall. You are hesitant to grant access, because you don’t want anything broken.
Or, perhaps you have operations staff who need to do basic troubleshooting. But as before, you don’t want too many people having full access.
You may have tried tackling this problem using privilege levels like this:
username testuser password C1sc0 privilege 5If you’ve done this, you may have found that levels 0 and 1 grant very restricted access. But all other levels grant full access. This is where Command Policies come in.
You have to define the policies yourself. Once you’ve done that, you can grant limited access to the ASA. In the previous example, you could grant read-only access to a policy.
We’re going to have a look at how to create command policies, and apply them with RADIUS. This applies to the traditional ASA image, not Threat Defence.
Command Policies
Command Authorization is assigning commands to different privilege levels. There are two ways you can do this:
- Local Privilege Levels, where everything is configured on each ASA
- TACACS+, where configuration takes place on a central TACACS server
In this article, we’ll look at using local privilege levels. Later, we’ll use RADIUS to log on.
We use the privilege command to configure a command policy, as shown below.
Command Syntax
! Command Syntax
privilege [show | clear | cmd] level ''level'' [mode {enable | configure}] command ''command''

! Example Command
privilege show level 8 command running-config
The command at the very end is the command that we grant privileges to. In the example, we’re granting access to the running-config command.
The level is the privilege level that’s required to run the command. Here we require the user to have level 8 or greater to run the command.
Each command has a variant. These are show, clear, and cmd. In the example, we allow show running-config, but not clear or cmd. cmd refers to commands that change the configuration. If you don’t specify anything, the ASA will allow all three variants.
Some commands behave differently in exec (user or privileged) and configuration mode. The mode command optionally specifies which mode the privilege applies to.
Example
The example below contains the commands needed to get ASDM access working.
privilege cmd level 3 mode exec command perfmon
privilege cmd level 3 mode exec command ping
privilege cmd level 3 mode exec command who
privilege cmd level 3 mode exec command vpn-sessiondb
privilege cmd level 3 mode exec command changeto
privilege cmd level 3 mode exec command packet-tracer
privilege show level 3 mode exec command reload
privilege show level 3 mode exec command mode
privilege show level 3 mode exec command firewall
privilege show level 3 mode exec command asp
privilege show level 3 mode exec command cpu
privilege show level 3 mode exec command interface
privilege show level 3 mode exec command clock
privilege show level 3 mode exec command dns-hosts
privilege show level 3 mode exec command access-list
privilege show level 3 mode exec command logging
privilege show level 3 mode exec command failover
privilege show level 3 mode exec command asdm
privilege show level 3 mode exec command arp
privilege show level 3 mode exec command ipv6
privilege show level 3 mode exec command route
privilege show level 3 mode exec command aaa-server
privilege show level 3 mode exec command aaa
privilege show level 3 mode exec command crypto
privilege show level 3 mode exec command ssh
privilege show level 3 mode exec command vpn-sessiondb
privilege show level 3 mode exec command dhcpd
privilege show level 3 mode exec command blocks
privilege show level 3 mode exec command wccp
privilege show level 3 mode exec command dynamic-filter
privilege show level 3 mode exec command service-policy
privilege show level 3 mode exec command module
privilege show level 3 mode exec command uauth
privilege show level 3 mode configure command interface
privilege show level 3 mode configure command access-list
privilege show level 3 mode configure command logging
privilege show level 3 mode configure command arp
privilege show level 3 mode configure command route
privilege show level 3 mode configure command aaa-server
privilege show level 3 mode configure command aaa
privilege show level 3 mode configure command crypto
privilege show level 3 mode configure command ssh
privilege show level 3 mode configure command ssh
privilege show level 3 mode configure command dhcpd
privilege clear level 3 mode exec command crypto
privilege clear level 3 mode exec command dns-hosts
privilege clear level 3 mode exec command logging
privilege clear level 3 mode exec command arp
privilege clear level 3 mode exec command aaa-server
privilege clear level 3 mode exec command dynamic-filter
privilege clear level 3 mode configure command logging
privilege clear level 3 mode configure command crypto
privilege clear level 3 mode configure command arp
privilege clear level 3 mode configure command aaa-server
privilege show level 5 mode exec command running-config
privilege show level 5 mode configure command privilege
privilege show level 5 mode configure command asdm
Working with RADIUS
The default behaviour is for privilege levels to apply to accounts in the local database. External accounts default to privilege level 15.
Change this behaviour by enabling authorization with authentication servers. First, enable local command privileges:
Enable Policies
! Enable local privilege levels
aaa authorization command LOCAL
Next, configure RADIUS logins to work with locally configured command policies:
! Enable authentication for external logins
aaa authorization exec authentication-server auto-enable
On the RADIUS server, be sure to use the following settings:
- Service-Type: Administrative
- Vendor-ID: 3076
- Attribute-ID: 220
- Value: The privilege-level you want to assign
Configuring NPS
We’ll have a look at using Microsoft’s NPS, as it’s a common RADIUS solution.
I’m going to assume that you already have NPS installed and basically set up. This also assumes that you have a RADIUS policy already configured. We’re just going to add command authorization functions here.
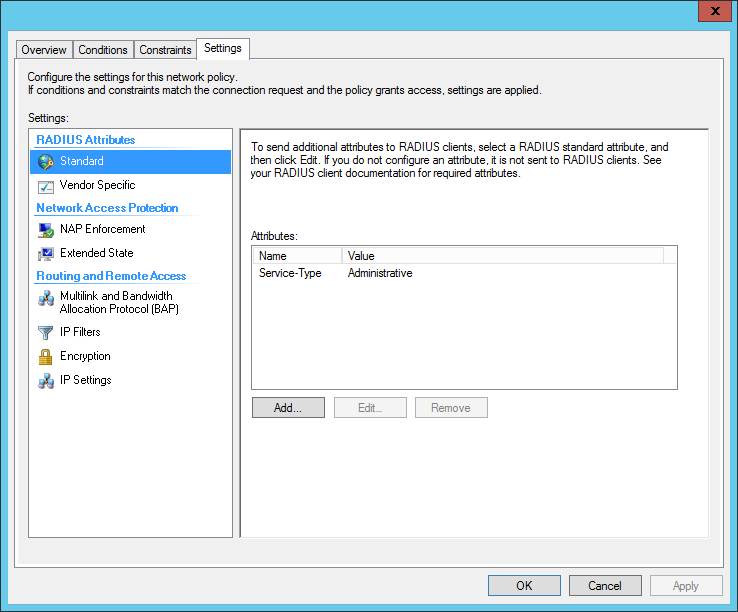
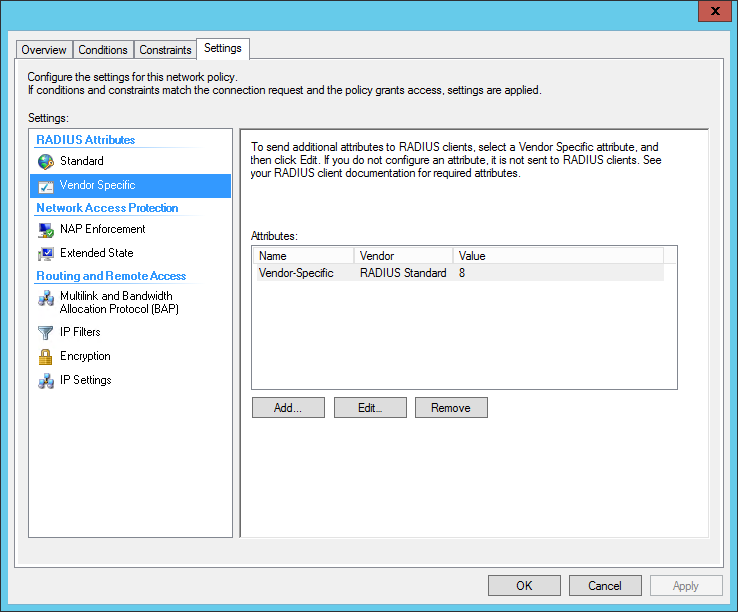
Edit your network policy, and Click the Settings tab. Under Standard RADIUS attributes, add Service-Type, and set it to Administrative.
Under Vendor Specific RADIUS attributes, add a Vendor Specific Attribute.
- Set the Vendor to Custom
- From the attributes list, select the Vendor-Specific attribute
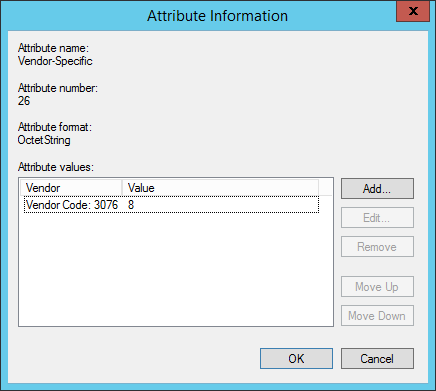
- Add an Attribute Value
- Select Enter Vendor Code, and use 3076 as the Vendor ID
- Select Yes it conforms
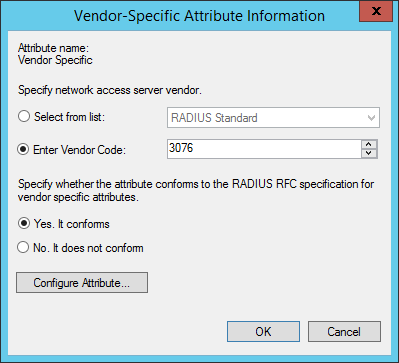
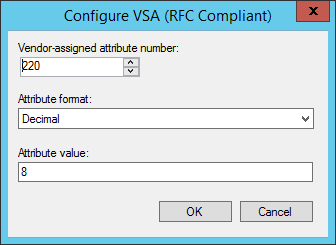
Click the Configure Attribute button.
- Set the Vendor-Assigned Attribute Number to 220
- Set the Attribute format to Decimal
- Set the Attribute Value to the privilege-level
Finished config:
References