
ASA and REST
Like most modern network devices, the ASA supports the REST API. However, it’s a bit different in some ways. For one, the ASA requires that you use HTTPS, rather than HTTP. Not an unreasonable request for a security appliance.
Also, the ASA needs to run a REST agent. Unlike many other devices, this is a separate installable component. Physical ASA’s need an extra file downloaded from Cisco and installed. Virtual ASA’s already have the file downloaded, but you still need to install it.
At the time of writing, version 1.32 of the REST API is current. Have the documentation available as you read through this article.
Installing and Enabling REST
You’ll need to download and install the REST client. Before that, check the compatibility matrix to make sure you use a supported version for your ASA.
If you are using multi-mode, check out the Caveats section later in this article.
The basic procedure is:
- Copy the image file to your ASA
- Verify and install the image
- Enable REST
- Make a REST call
Copy the SPA file to disk0 on the ASA. Then, verify and install the image with the rest-api image disk0:/filename.spa command. This does not cause a reboot.
You must also enable the REST API before using it. The first part of this is to enable the http server with http server enable. If you’re using the ASDM, this is already enabled. Also, remember to specify allowed IP’s and interfaces for management.
HTTP authentication also needs configuration. This can be anything that AAA supports, like LOCAL or RADIUS. The account privileges vary depending on what you need to do. Basic monitoring needs level 3, and GET requests need level 5. Any configuration changes need level 15.
Finally, the agent can be enabled with the rest-api agent command.
Example configuration
! Copy the SPA file to the local disk
copy tftp://x.x.x.x/filename.spa disk0:

! Verify and install the image
rest-api image disk0:/filename.spa

! Enable HTTP and management
http server enable
http 10.10.10.0 255.255.255.0 mgmt0
aaa authentication http console LOCAL

! Create an account
username admin password c1sc0 privilege 15

! Enable the agent
rest-api agent
To test this, open a browser, and go to https://x.x.x.x/api/objects/networkobjects. This should return some basic JSON data. As long as it doesn’t return an error, you’re good to go.
Authentication
There are two ways you can authenticate. Basic, which uses a simple username and password in every request, and Token-based.
Basic Authentication
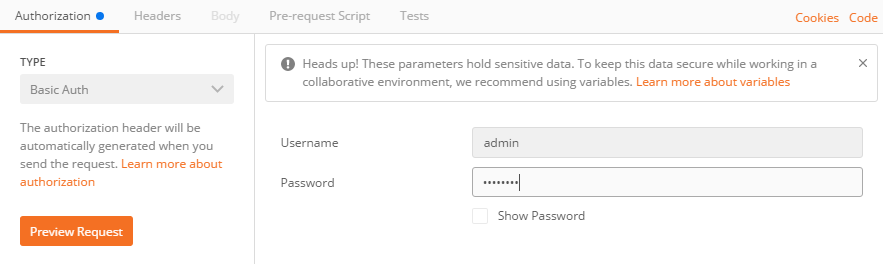
Basic Authentication uses special headers containing the username and the Base64-encoded password. You have to pass these headers with every request. This is usually a simple method to use when testing in Postman.
There are two ways you can try this. The simplest option is to get Postman to do the work:
- Go to the Authorization tab
- Set the type to Basic Auth
- Enter the username and password
- Postman will generate the headers automatically (which you can see with the preview request button)
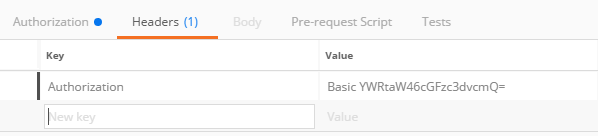
If you’re not using Postman, you have to work out the headers yourself:
- Create a string, made up of your username and password, separated by a colon
- For example, admin:c1sc0
- Use some tool to encode it into Base64
- This will look something like QWRtaW46UGFzc3dvcmQ=
- Create a header called Authorization. The value starts with “Basic ” and is followed by the Base64 string
- For example, Basic QWRtaW46UGFzc3dvcmQ=
If you’re going to test this in Postman, be wary of self-signed certificates. Often ASA’s use self-signed certificates, which Postman does not tollerate by default. To fix this:
- Go to File -> Settings
- Click the General tab
- Disable SSL Certificate Verification
Token Authentication
Token authentication uses a special request to create a session. The token is then passed with each request, rather than a username and password. This is the best option if you’re using code, not Postman.
To create a token:
- Set the Content-Type header to application/json
- Set the headers as in Basic Authentication
- POST the request to https://x.x.x.x/api/tokenservices
- The ASA will return a result
- Code 204 (No Content)
- An X-Auth-Token header, with the token included
- Save the token to use later
To use a token:
- Prepare a request as normal
- Set the X-Auth-Token header, with the token as the value
- Send the request
To delete the token (that is, to log out):
- Set the Content-Type header to application/json
- Set the X-Auth-Token header to the token value
- DELETE to https://x.x.x.x/api/tokenservices/TOKEN
- Where TOKEN is the token value
REST Documentation
The ASA includes some built-in interactive documentation. To access it, browse to https://x.x.x.x/doc. Sometimes the ASA seems to strip the https out of the URL and the page won’t load. If this happens, just add it back in and try again.
On the left is a list of categories. As an example, click Save. In the middle of the screen are all the resources. Save includes a single resource, called /api/commands/writemem. Click on the resource for more detail. You can also see the headers that need to be set for this request.
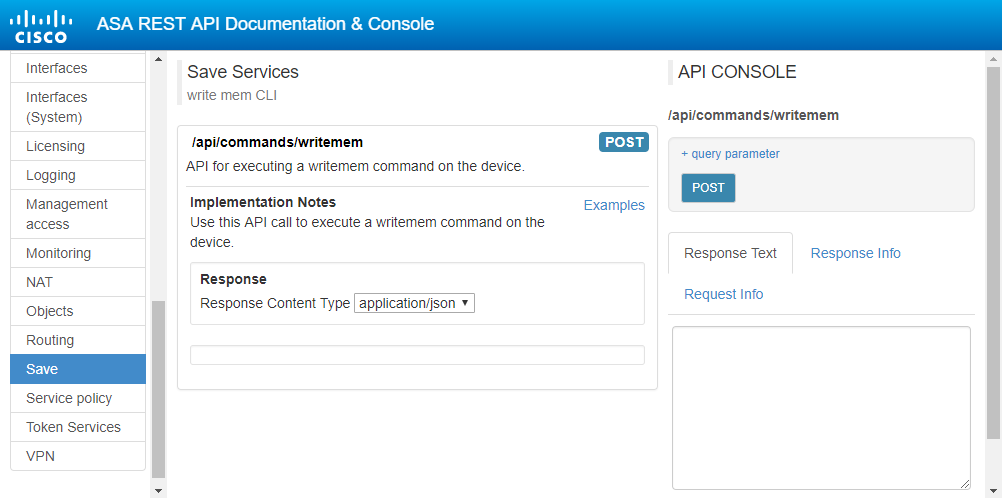
Each resource lists the methods that it supports. Writemem supports only the POST method. If you click the method, you have the option of sending it to the ASA (see the screen on the right). This really does send the query to the ASA, so be cautious when you use it.
Also on the right-hand side of the screen are tabs to see the request and response information. The Request Info tab shows what you posted to the ASA. The Response Texttab shows the JSON data that the ASA returned.
Error responses
All responses include a status code. Errors codes will be 400, 404, 405, 5xx.
Error responses may also include JSON data with more information, as shown below.
[
  { "code" : "string",
  "details": "string",
  "context": attribute name,
  "level" : Error/Warning/Info
  },
]
Examples
Now it’s time for a few examples. We’re going to write the running-config to disk, send CLI commands, and backup the config. Have a look through the documentation while you try these examples.
Example 1 – Write Config
- Set the Content-Type header to application/json
- Leave the request-body empty
- Include your authentication header
- POST the request to /api/commands/writemem
- If all is good, the ASA returns a 200 code
Example 2: CLI Commands
- Set the Content-Type header to application/json
- Set the request-body as shown in the example below. This gets the serial number of the ASA
- Include your authentication header
- POST the request to /api/cli
- If all is good, the ASA returns:
- A 200 code
- The result of the command in the message body
{
  "commands": [
    "show version | include Serial"
  ]
}
Example 3: Backup config
- Set the Content-Type header to application/json
- Set the request-body as shown in the example below
- location is the path for the backup
- passphrase is the password used to encrypt sensitive data
- Optionally, context specifies the context to back up
- Include your authentication header
- POST the request to /api/backup
- If all is good, the ASA returns a 201 (Created) code
{
  "location": "disk0:/backup.tar.gz",
  "passphrase": "Password"
}
Note, you can restore the backup to an ASA by POSTing to /api/restore. This is disruptive though, as it will reboot the ASA.
Caveats
There are a few final things you need to know…
Making changes with REST does not prevent making changes with other methods, such as CLI or ASDM. So, keep in mind that other admins could still be making conflicting changes.
REST changes only affect the running-config. Just like in the CLI or ASDM, you still need to save your config.
If you use the aaa authorization command, you need to create a user called enable_1 with a privilege level of 15. RADIUS uses this to parse the config initially, and whenever there are any changes.
Multi-mode has limited support. You can save config, backup/restore config, use token services, and send CLI commands. Fortunately sending CLI commands enables you to do just about everything.