
BGP Communities
The main purpose of BGP enabled routers is to advertise prefixes to other routers. These prefixes can be from several different address families, such as IPv4 and VPNv4. When advertising a prefix, BGP attaches extra information, called attributes. BGP uses these attributes to select the best path.
BGP can include more information with each prefix, in the form of Community Strings. A community string is a number value that the peer uses like a tag.
Communities create routing policies between peers. By tagging prefixes with communities, we tell the peer to handle the prefixes in a special way.
As an example, lets say that a specific group of prefixes need to have their weight set to 10 by a peer router. We can choose a community number to use, and tag the prefixes with it. If it sees a prefix from us tagged with this community, it will set the weight to 10.
We do have to agree with our peer on which communities to use. From a technical perspective, it’s up to them to decide how they will handle any community string. They could choose to ignore them altogether if they want to.
Providers may have a list of pre-defined communities that they use, and actions that they take. As the customer, we can set our communities to match their policies, to tune how they handle our prefixes.
Communities are optional and transitive. They are transitive so one peer can pass them to the next peer.
Each standard community is a 32-bit value. They are often broken into two 16-bit values, to make them easier to read. For example, the community 4259840100 is the same thing as 65000:100. Often the first 16-bits represent the AS, and the second 16-bits are a custom value.
There are also extended communities, which are for special purposes, such as MPLS VPN’s. These are 64-bit values. They comprise of a 16-bit type value, a 16-bit AS or IP value, and 32-bits for the custom community value.
Large Communities
Standard communities use a 32-bit value split into two 16-bit fields (AS:value). This works fine for 2-byte ASNs, but the first field can’t hold a 4-byte ASN — AS 131072 won’t fit. RFC 8092 introduced Large Communities to solve this. They use a 96-bit format: ASN:value1:value2, where ASN is a full 4-byte value and both value fields are 32 bits.
Large communities are commonly used by providers with 4-byte ASNs, and are increasingly the preferred format for new deployments.
Setting a large community uses the set large-community command in a route-map. You also need to enable sending large communities to each neighbour explicitly:
route-map SET_COMMUNITY permit 10
 match ip address prefix-list MY_PREFIXES
 set large-community 131072:1:100

router bgp 131072
 neighbor 10.10.10.2 send-community large
Verify that the large community is being received:
R2#show ip bgp 172.16.0.0
BGP routing table entry for 172.16.0.0/24, version 5
Paths: (1 available, best #1, table default)
    10.10.10.1 from 10.10.10.1 (172.16.20.1)
      Origin IGP, metric 0, localpref 100, valid, external, best
      Large Community: 131072:1:100
Note:
send-community largeonly sends large communities. Usesend-community bothto send standard and large communities together, orsend-community allto include extended communities as well.
Some communities are reserved:
- 0:0 – 0:65535
- 65535:0 – 65535:63335
Configuration
Let’s lab this out to see how it works. Please be aware that this is not a real-world scenario.
For this lab, we’ll use two router’s with different ASN’s. R1 has several networks it wants to advertise to R2.
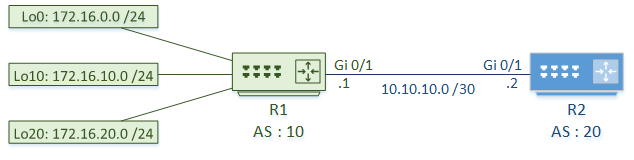
R2 assigns weights to the prefixes, depending on the attached communities:
- If the community is set to 10:100, it will set the weight to 100
- If the community is set to 10:200, it will set the weight to 10
R1 – Assign Communities
Prefix lists identify the routes to assign communities to. In this case, 172.16.0.0 and 172.16.10.0 is in Group1, and 172.16.20.0 is in Group2.
Route-maps match the prefix lists, then set the community on the route. Group1 is assigned community 100, and Group2 is assigned community 200.
By default, the communities are one large number, which is hard to read. The ip bgp-community new-format command changes this value to the ASN:Community format. This makes verification easier later on.
By default, Cisco routers do not send communities. Enable this per neighbour with the send-community and send-community extended commands.
Finally, the route map is applied to the neighbour outbound. When sending routes to the neighbour, the communities are attached.
R1 – Assign Communities
! Identify networks with prefix lists
ip prefix-list Group1 seq 5 permit 172.16.0.0/24
ip prefix-list Group1 seq 10 permit 172.16.10.0/24
ip prefix-list Group2 seq 5 permit 172.16.20.0/24

! Match networks, and set community values
route-map R2_Peer permit 10
 match ip address prefix-list Group1
 set community 10:100

route-map R2_Peer permit 20
 match ip address prefix-list Group2
 set community 10:200

! Enable the new community format
ip bgp-community new-format

router bgp 10
 ! Enable sending communities
 neighbor 10.10.10.2 send-community
 neighbor 10.10.10.2 send-community extended

 ! Apply the route map to this neighbour
 neighbor 10.10.10.2 route-map R2_Peer out
Adding Communities Without Replacing Existing Ones
By default, set community replaces all existing communities on a prefix. If a prefix has already been tagged with community 10:100 and a second route-map sets 10:200, the result is 10:200 only — 10:100 is gone.
To add a community without removing existing ones, use the additive keyword:
route-map R2_Peer permit 10
 match ip address prefix-list Group1
 set community 10:100 additive
This is important when a prefix passes through multiple route-maps, or when you want to stack multiple communities for different peers to act on. Verify that both communities are present:
R2#show ip bgp 172.16.0.0
...
      Community: 10:50 10:100
Verify Communities
Here, we can see that the communities are set on the routes that R2 receives.
R2 Verification
! Enable the new community format
ip bgp-community new-format

! Verify that the community is set
R2#show ip bgp 172.16.0.0
BGP routing table entry for 172.16.0.0/24, version 2
Paths: (1 available, best #1, table default)
  Not advertised to any peer
  Refresh Epoch 1
  10
    10.10.10.1 from 10.10.10.1 (172.16.20.1)
      Origin IGP, metric 0, localpref 100, valid, external, best
      Community: 10:100
      rx pathid: 0, tx pathid: 0x0

R2#show ip bgp 172.16.20.0
BGP routing table entry for 172.16.20.0/24, version 4
Paths: (1 available, best #1, table default)
  Not advertised to any peer
  Refresh Epoch 1
  10
    10.10.10.1 from 10.10.10.1 (172.16.20.1)
      Origin IGP, metric 0, localpref 100, valid, external, best
      Community: 10:200
      rx pathid: 0, tx pathid: 0x0
Set Policies
Now that R2 is receiving routes with communities, it can apply policies to them.
First, we create a community list to identify specific communities. These are like using ACLs or prefix-lists to identify IP addresses. In this example we use a named community list. Unlike numbered community lists, they support RegEx, and may have unlimited entries. Numbered lists have a limit of 100 entries.
Route-maps match the community, and set the weight.
The route-map is applied to the neighbour for inbound prefixes.
R2 – Set Policies
! Create a named community list to identify the communities
ip community-list expanded High_Weight permit 10:100
ip community-list expanded Low_Weight permit 10:200

! Create a route-map to match the communities, and set the weight
route-map R1_Peer permit 10
 match community High_Weight
 set weight 100

route-map R1_Peer permit 20
 match community Low_Weight
 set weight 10

! Apply the route map to the neighbour
router bgp 20
 neighbor 10.10.10.1 route-map R1_Peer in
These changes will not take place for routes already in your routing table. The easiest way to force this to apply is to reset the neighbour relationship. Bear in mind that this is disruptive, so don’t do it in a production network.
Verify Policies
If you look at the BGP table on R2, you can see that the weights have been set as expected.
R2 – Verification
! Verify that the weights are set
R2#show ip bgp
BGP table version is 4, local router ID is 10.10.10.2
Status codes: s suppressed, d damped, h history, * valid, > best, i - internal,
              r RIB-failure, S Stale, m multipath, b backup-path, f RT-Filter,
              x best-external, a additional-path, c RIB-compressed,
Origin codes: i - IGP, e - EGP, ? - incomplete
RPKI validation codes: V valid, I invalid, N Not found

     Network          Next Hop            Metric LocPrf Weight Path
 *>  172.16.0.0/24    10.10.10.1               0           100 10 i
 *>  172.16.10.0/24   10.10.10.1               0           100 10 i
 *>  172.16.20.0/24   10.10.10.1               0            10 10 i
Stripping and Deleting Communities
In practice, you often need to remove communities before advertising prefixes to a peer — for example, stripping internal tagging before sending routes to a customer or IX peer.
Remove all communities from a prefix:
route-map STRIP_ALL_COMMUNITIES permit 10
 set community none
Apply this outbound to the peer you want to strip communities from:
router bgp 10
 neighbor 10.10.10.2 route-map STRIP_ALL_COMMUNITIES out
Remove specific communities only:
Use set comm-list ... delete to remove only the communities matched by a community list, leaving others intact. This is useful when you want to strip internal tagging but preserve communities set by the customer.
! Match all communities in AS 65000
ip community-list expanded INTERNAL_COMMUNITIES permit 65000:.*

route-map STRIP_INTERNAL permit 10
 set comm-list INTERNAL_COMMUNITIES delete
Tip: Always add a final
permitclause with nosetstatement at the end of the route-map, or prefixes that don’t match earlier clauses will be dropped.
Well Known Communities
There are several pre-defined communities, called Well Known Communities. These communities have special pre-defined meanings that all BGP speakers support.
The more common ones include:
Internet – A Cisco proprietary community. This allows the router to advertise the prefix to all neighbours. This is a ‘catch-all’ community at the end of a community list. This is an exception, as it not all vendors will support it.
No-Export – Prevents advertising the prefix to any eBGP neighbours. This keeps a prefix in the AS.
No-Advertise – This prevents advertising the prefix to any neighbours at all.
Local-AS – Used with confederations to keep the prefix within the local AS. Allows prefix sharing with eBGP neighbours within the confederation.
Applying Well-Known Communities
Here’s how to apply the most common well-known communities in a route-map:
! Keep these prefixes inside the AS - don't advertise to eBGP neighbours
route-map SET_NO_EXPORT permit 10
 match ip address prefix-list LOCAL_PREFIXES
 set community no-export

! Keep these prefixes completely private - don't advertise to anyone
route-map SET_NO_ADVERTISE permit 10
 match ip address prefix-list PRIVATE_PREFIXES
 set community no-advertise

! Used with confederations - keep the prefix within the local member AS
route-map SET_LOCAL_AS permit 10
 match ip address prefix-list CONFEDERATION_PREFIXES
 set community local-AS
Apply the route-map to the relevant neighbour outbound:
router bgp 10
 neighbor 10.10.10.2 route-map SET_NO_EXPORT out
Verify using show ip bgp — you should see the community in the prefix entry:
R1#show ip bgp 172.16.0.0
...
      Community: no-export
Designing for Communities
When designing communities, consider these basic steps:
- Define the routing administrative policy
- Decide what to filter, and where to filter
- Decide what attributes to change to influence traffic flow
- Design the community scheme
- That is, decide which values to use, based on the policy
- Deploy the scheme using route maps
- Create documentation
When receiving routes from an external source, consider tagging them based on the site they were received on. Likewise, when originating routes, consider tagging them with an ID for the site that originated them.