
Private VLANs
Traditional VLANs
VLANs provide isolation at layer 2. They are kind of a way of making a single switch act like several switches.
Usually, there is a single subnet per VLAN, and all devices in the VLAN/subnet can communicate with each other.
If devices in different VLANs need to communicate, we need to add a router, or if you’re feeling particularly brave, some special cabling.
Why use Private VLANs
Traditional VLANs have a limitation. What if you want to put several devices on a single subnet, but you don’t want all devices to communicate?
Imagine that we start with a small network. A single VLAN, three servers, and a router as a default gateway.
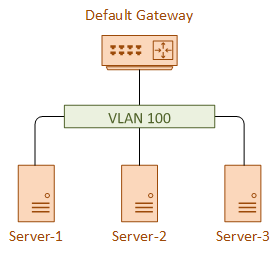
These servers are managed by different departments. Server’s 1 and 2 are managed by one team, and server 3 is managed by another team.
We decide that server 1 and 2 should be able to communicate with each other, but server 3 should be isolated. To make it harder, we don’t want to readdress anything, and all devices need to reach the default gateway.
This is where we can use private VLANs.
How PVLANs Work
Private VLANs are actually a collection of VLANs. There is a single primary VLAN, and one or more secondary VLANs.
The primary VLAN is nearly the same as a normal VLAN. They are promiscuous, as they will happily communicate with any device.
The secondary VLANs are associated with the primary VLAN. These VLANs keep the devices separate from each other.
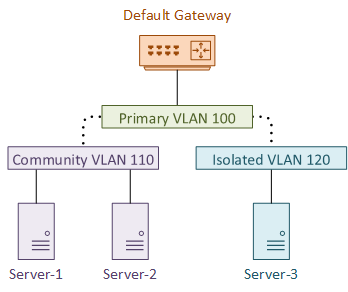
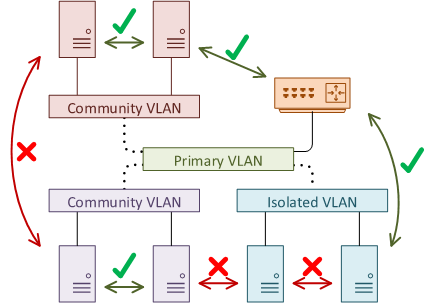
There are two types of secondary VLANs. Devices with a Community VLAN will be able to communicate with each other, but not with any other secondary VLAN.
Devices in one community VLAN cannot communicate with devices in a different community VLAN.
The second type is the Isolated VLAN. Devices in an isolated VLAN cannot communicate with each other even if they are in the same isolated VLAN. They also cannot connect to devices in a community VLAN.
Everything can connect to devices in the primary VLAN. This is why routers are often placed here. This allows segregated devices to share internet connections, and links to other parts of the network.
Ports in the primary VLAN are known as Promiscuous Ports (P-Ports). A layer-3 switch can have an SVI configured in the primary VLAN.
Ports in a secondary VLAN are often called Host Ports, as this is generally where hosts connect.
A host port in an isolated VLAN is called an I-Port. A host port in a community VLAN is a C-Port.
SVI’s can not exist in the secondary VLANs.
Configuration
Start by configuring the VLANs globally. This is where we define the VLAN type (primary, community, isolated).
vlan 100
 name Primary
 private-vlan primary

vlan 110
 name SecCommunity
 private-vlan community

vlan 120
 name SecIsolated
 private-vlan isolated
The secondary VLANs need to be associated with the primary VLAN:
vlan 100
 private-vlan association 110,120
Each port needs to be configured appropriately with the switchport command. We don’t set access mode anymore. Instead the type is private-vlan.
Host ports (VLANs 110 and 120 below) are associated with the primary VLAN (VLAN 100).
The P-Port is configured with a mapping to each secondary port.
interface GigabitEthernet0/1
 description C-Port
 switchport private-vlan host-association 100 110
 switchport mode private-vlan host

interface GigabitEthernet0/2
 description I-Port
 switchport private-vlan host-association 100 120
 switchport mode private-vlan host

interface GigabitEthernet0/3
 description P-Port
 switchport private-vlan mapping 100 110,120
 switchport mode private-vlan promiscuous
Show Commands
Core#show vlan private-vlan

Primary Secondary Type              Ports
------- --------- ----------------- ------------------------------------------
100     110       community         Gi0/1, Gi0/3
100     120       community         Gi0/2, Gi0/3
Trunking
So what about trunking? If you want to trunk between two switches that are PVLAN aware, your job is easy. Just configure them with normal trunk links. No special configuration required.
Now for the tricky bit. What if you want to trunk between a PVLAN aware switch and a non-PVLAN aware switch?
This does require special configuration. The trunk ports can be configured in two ways, depending on your needs, and platform support (not all platforms support both options).
One option is to configure a Promiscuous PVLAN Trunk. When traffic from a secondary VLAN needs to pass over the trunk, the secondary VLAN tag is rewritten with the primary VLAN tag.
This makes the secondary VLAN look like it’s part of the primary VLAN. This may be useful for an external router on a stick, to route between several primary VLANs.
The other option is to configure an Isolated PVLAN Trunk. This option rewrites the primary tag on the frame to use the secondary VLAN ID.
This works for isolated VLANs, but not for community VLANs.
Labs
References