Lab: Configuring HSRP
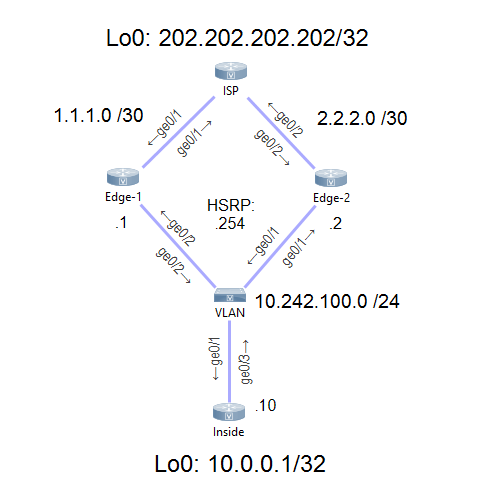
Topology
In this topology, we’re trying to get to the internet while using redundant edge routers.
The edge routers both connect to providers, simulated by the ISP router. BGP is already configured.
The Inside Router represents a host on the inside network.

Download the HSRP Lab Files HERE!
Goal
The ISP router and the Inside router have already been configured. BGP has been configured between the edge routers and the ISP.
The goal is to configure HSRP, so a failure of one router will not impact access to the internet.
Additionally, traffic should still be able to flow if an upstream link fails.
NOTE: For the purposes of this lab, there is no NAT.
I encourage you to try this out yourself now. The solution is below if you get stuck, or you’d like to see how I did it.
Solution
The first thing to note is the interfaces used here. I was trying to be clever, but I seem to have made it more difficult…
Notice that Gi0/1 and Gi0/2 are swapped on the two edge routers? Keep that in mind as we progress through the config.
To get basic HSRP running, we start by configuring the interfaces FACING THE LAN.
All HSRP configuration is based on the standby command. Here, we’re using group 1 (because you can use HSRP in more than one place), and giving the interface a virtual IP.
interface GigabitEthernet0/2
 standby 1 ip 10.242.100.254
Repeat this on Edge-2, and remember to use Gi 0/1.
This virtual IP is the default gateway for the inside switch. In fact, if you log on to the Inside router, you will be able to ping this IP, and ping 202.202.202.202 on the internet.
If it doesn’t work straight away, it’s likely because the routers are still deciding who is primary and who is standby. I’ve found that it’s slower in a virtual lab than it is on real hardware.
On one of the edge routers, run show standby.
In my case, Edge-1 is the standby router, meaning that Edge-2 is active.
Edge-1#show standby
GigabitEthernet0/2 - Group 1
  State is Standby
    3 state changes, last state change 00:01:48
  Virtual IP address is 10.242.100.254
  Active virtual MAC address is 0000.0c07.ac01
    Local virtual MAC address is 0000.0c07.ac01 (v1 default)
  Hello time 3 sec, hold time 10 sec
    Next hello sent in 1.744 secs
  Preemption disabled
  Active router is 10.242.100.2, priority 100 (expires in 9.504 sec)
  Standby router is local
  Priority 100 (default 100)
  Group name is "hsrp-Gi0/2-1" (default)
You might think that we’ve achieved our goals, and in part we have. But what if an upstream link fails? If the Gi0/2 link failed right now, we would be sending traffic into a blackhole.
Let’s work on this by configuring an IP SLA. If you’re not familiar with this, it’s a small service on the router that can be used to (among other things) regularly ping an IP to see if it’s up.
Here, we’re defining SLA number 1, and it’s going to ping 1.1.1.1 every five seconds, using interface Gi0/1.
We also set a schedule that starts now, and never expires.
ip sla 1
 icmp-echo 1.1.1.1 source-interface GigabitEthernet0/1
 frequency 5
ip sla schedule 1 life forever start-time now
When you configure this on Edge-2, remember to change the IP we’re pinging to 2.2.2.2, and change the source interface.
Use show ip sla statistics to see if it’s working correctly.
Next, we assign a tracking object. This just tracks the results of the ping, and whether they were successful.
track 1 ip sla 1 reachability
You can verify this with show track 1.
Now we can assign this to our interface. Here we’re linking the tracking object to our HSRP configuration.
Each HSRP member has a priority of 100 by default. If the tracking object goes down on one of the routers, it will subtract 20 from the priority.
interface GigabitEthernet0/2
 standby 1 track 1 decrement 20
This is the start to how we force role change between the routers if a link fails. If I take the link on Edge-2 down, we’ll see the tracking object fail:
*Mar 22 05:47:56.562: %TRACK-6-STATE: 1 ip sla 1 reachability Up -> Down
But you will notice that the role didn’t change. If we try pinging to the internet from the inside router, it will fail. We need the alternate router to take over.
For that, we add a few more lines of config:
interface GigabitEthernet0/2
 standby version 2
 standby 1 preempt delay minimum 30
 standby 1 priority 100
OK, technically, we don’t need all these lines to make it work. I’ve set the version as that’s just a good practice.
The preemt line is the important one. This tells the router to automatically assume the active role if it has the highest priority.
The delay part of the command tells the router to wait 30 seconds before taking over the active role. This gives the routers time to converge and learn all the routes it needs (eg, from EIGRP or OSPF) before taking over.
30 seconds for a failover may be excessive, and in production you may need to tune this value. I’ve chosen 30 seconds here to prove my point.
Finally, I like to manually set the priority. Here I’m using 100 on the Edge-1 router, and (although not shown) I use a priority of 90 on Edge-2.
This last change will have forced Edge-1 to become the active router:
GigabitEthernet0/2 - Group 1 (version 2)
  State is Active
    6 state changes, last state change 00:03:04
  Virtual IP address is 10.242.100.254
  Active virtual MAC address is 0000.0c9f.f001
    Local virtual MAC address is 0000.0c9f.f001 (v2 default)
  Hello time 3 sec, hold time 10 sec
    Next hello sent in 2.448 secs
  Preemption enabled, delay min 30 secs
  Active router is local
  Standby router is 10.242.100.2, priority 90 (expires in 9.232 sec)
  Priority 100 (default 100)
    Track object 1 state Up decrement 20
  Group name is "hsrp-Gi0/2-1" (default)
And now if I break Edge-1’s uplink, we see a role change:
*Mar 22 05:56:58.697: %TRACK-6-STATE: 1 ip sla 1 reachability Up -> Down
*Mar 22 05:57:30.734: %HSRP-5-STATECHANGE: GigabitEthernet0/2 Grp 1 state Active -> Speak
*Mar 22 05:57:42.318: %HSRP-5-STATECHANGE: GigabitEthernet0/2 Grp 1 state Speak -> Standby
Play around with this yourself, and see what results you get!
Next Steps
I’m looking at adding a lab based on this one that adds in NAT (and severely complicates the situation).
Let me know what you think in the comments.
how is the lab free when it ask for a app
This one should be free. Are you getting an error?