Firepower Intrusion Detection
Firepower uses the SNORT engine to perform deep packet inspection. SNORT is a pattern matching regex engine. It will look for patterns in the traffic, rather than only header information, like IP and port. Each SNORT rule is a regex string that matches a known attack.
Firepower Intrusion Policies enable IPS functions. These policies are a collection of SNORT rules. These rules are evaluated against traffic flows.
There are several default policies, so you don’t need to know details about each rule. If you have an active subscription, you can get updates for these policies from Talos. If you want, you can create your own policies. This is useful to tune performance, or if a rule is triggering incorrectly.
In a packet, the payload looks like a string of bits. To make sense of this, firepower may use a Network Analysis Policy. This is a pre-processor, which looks at layer 1-3 information to determine what the traffic is. This is like pre-processors in Wireshark.
If firepower can determine the traffic type, it can improve performance. For example, it may determine that a particular flow is SMTP traffic. It will then determine that it is a waste of resources to scan the traffic for threats that relate to HTTP.
Intrusion policies linked to Access Control Policies. After Security Intelligence and the SSL policy, Network Analysis determines the traffic type. After this, the intrusion policy applies, either based on a rule, or as the default action. Remember that Intrusion and File policies are not evaluated for encrypted payloads. Use an SSL Policy to scan these traffic types if needed.
SNORT uses a set of internal variables. These specify details like inside and outside networks, special ports, and so on. To improve accuracy, the Intrusion Policy may use a custom variable set.
Policies
Default Policies
There are several policies that FMC uses by default, which are regularly updated. They can be used as a base policy when creating your own policies.
- Balanced Security and Connectivity – A compromise of speed and detection
- Connectivity over Security – Used when connectivity is more important. Only the most critical rules are enabled
- Security over Connectivity – When connectivity is the secondary concern. Enables most rules. May result in higher false positives
- Maximum detection – Every rule is turned on, and will likely result in false positives. Best to only use this for labs and testing
- No Rules Active – All rules are disabled. Would generally only be used as a template
Custom Policies
Custom policies are deployed as layers, to create a policy hierarchy. The policy at the bottom is the Base Layer. There may be several layers to a customised policy. Each configurable layer is a User Layer. When creating a new policy, the default user layer is called My Changes. You can rename it if you wish. If settings conflict, higher layers will override lower layers.
All custom policies must have an existing policy as the base layer. This means that each custom policy has a base system policy. This is useful if you are happy with a system policy, but want to tune a few options.
Updates to the system policy will affect any custom policies built upon them. The Balanced policy is a good place to start. If you want to build a policy from the ground up, consider starting with the No Rules policy.
A policy may be set to inline mode. This makes the appliance an IPS, as it is able to detect threats and take action on them. If inline mode is not set, the appliance is an IDS, as it is only capable of detecting threats.
Customised network analysis policies can tune pre-processors. For example, if you don’t have web servers in your network, then there’s no need to identify threats to IIS or Apache.
Firepower can make recommendations based on what it has learned about the network. For example, it will see that you have no Windows NT servers in your network (right?) and disable SNORT rules that look for these vulnerabilities. You may review any recommendations first, or configure automatic deployment. This could also be a scheduled task.
Recommendations are configured and applied within an Intrusion policy. Accepting recommendations creates a new read-only layer. Remove this layer later if you need to revert back to defaults. Manual policy changes are not overridden by recommendations.
Creating Policies
We’ll have a look at the basics of creating Network Analysis and Intrusion Policies. This won’t include detailed information about SNORT rules, or design recommendations.
Network Analysis Policies
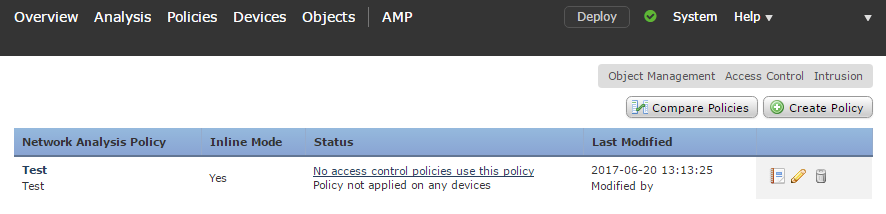
To create a new Network Analysis Policy, browse to Policies -> Access Control -> Intrusion. In the top right of the screen, click the link to the Network Analysis Policy section.
Click Create New Policy, and enter a name and description. Tick the Inline Mode option, and select a suitable base policy. When you’re done, finish by clicking Create Policy.
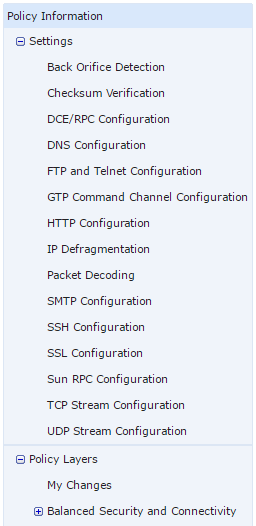
The left side of the screen contains various categories and policy layers. Each category contains several editable options.
The policy information screen contains basic settings. When making changes, you need to click Commit Changes to save the policy. After it has saving the policy, it need’s to be deployed one or more appliances.

Creating Intrusion Policies
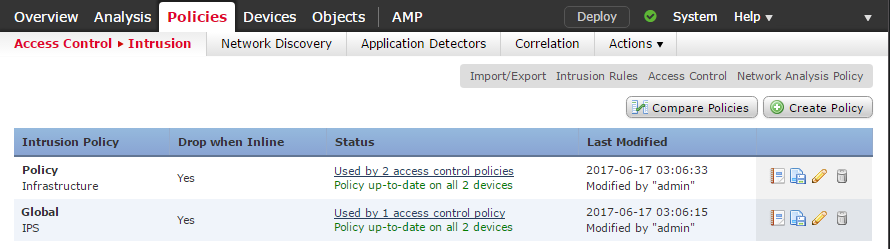
To create a custom Intrusion Policy, browse to Policies -> Access Control -> Intrusion, and click Create Policy.
In the dialog, enter a name and description, enable Inline Mode, and select a suitable base policy. Finally, click Create Policy.
The Policy Information screen shows the basic information you set during policy creation. It will show the number of active rules in this policy, and any applied recommendations.recommendations that have been applied.
On the left is a link to the Rules screen. This screen shows all the IPS rules and the action for the rule. Rule actions may be set to:
- Generate events – Log the connection, but take no action
- Drop and generate events – Drop the traffic, and log the connection
- Disabled – Do nothing; This rule is not in use
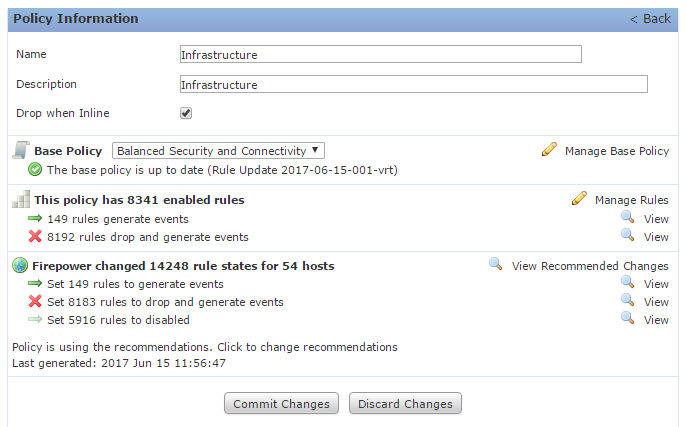
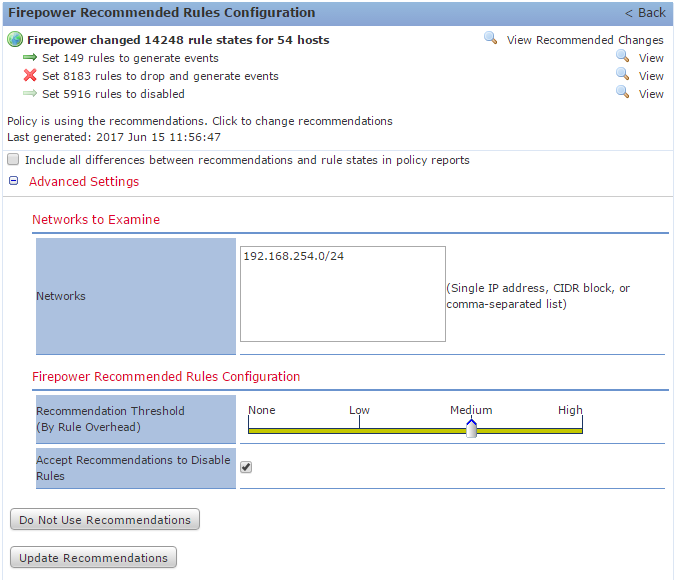
On the left, there is a link to the Firepower Recommendations screen. To use recommendations, set the advanced settings, and click Generate Recommendations. This gives you an opportunity to review the changes before applying them. If you’re happy with the recommendations, click Use Recommendations.
The advanced options are:
- Include all differences between recommendations and rule states in policy reports – By default, only enabled rules are listed. This option shows anything that’s different, even if disabled
- Networks to Examine – Lists the networks to examine for recommendations
- Recommendation Threshold (By Rule Overhead) – Prevents the system from automatically enabling rules with an overhead higher than the specified threshold
- Accept Recommendations to Disabled Rules – Allow recommendations to disable rules
You can use the Update Recommendations to get the latest recommendations from Firepower. recommendations may change based on network changes or rule updates.
References
Cisco – An Overview of Network Analysis and Intrusion Policies
Cisco – Layers in Intrusion and Network Analysis Policies
Cisco – Tailoring Intrusion Protection to Your Network Assets