
Dynamic Multipoint VPN (DMVPN)
DMVPN’s are a highly scalable, and easy to manage tunnel solution. While similar in many ways to traditional tunnels like an IPSec site-to-site VPN, or a GRE tunnel, DMVPN doesn’t have the static nature of traditional VPNs.
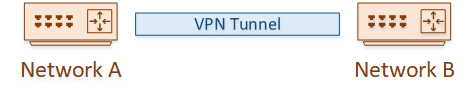
Traditional tunnels are point-to-point. This means that you have two routers and you connect them together with a virtual tunnel.
In many cases, this may be fine. If you’ve only got two sites to connect, this type of tunnel will fit perfectly.
But what if you have many sites? Maybe a head office and many branch sites? Each branch site means configuring and managing a separate tunnel. The more spoke sites you have, the more complicated it gets.
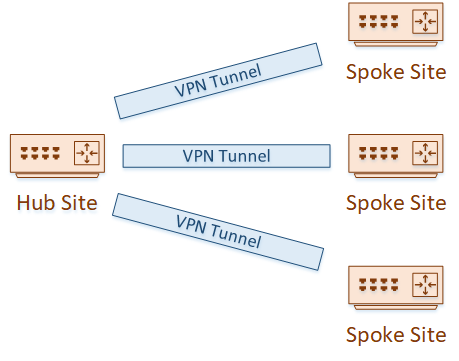
And what if the internet connections at the branch sites have dynamic public IP’s? GRE requires statically defined endpoints, which makes dynamic IP’s impossible.
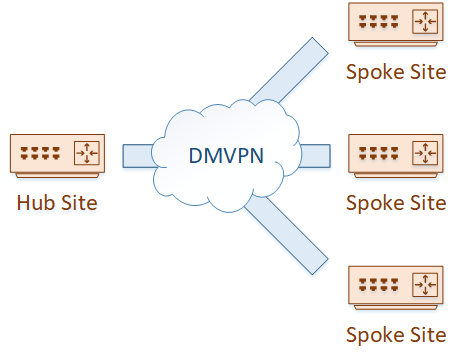
That’s where DMVPN comes in. DMVPN allows us to configure a single tunnel at the hub site. Each spoke site can then simply join the DMVPN network, with minimal effort, and optionally with dynamic IP addresses.
How DMVPN Works
DMVPN is a combination of a few technologies that you may have already used:
- Multipoint GRE for building the tunnels
- Next Hop Resolution Protocol (NHRP), which allows the spokes to register with the hub
- CEF, for optimal performance
- Optionally, a dynamic routing protocol
- Optionally, IPSec for encryption
You start with a DMVPN hub. This would typically be placed at your main site. You can then add a spoke router.
With minimal configuration, the spoke will register itself with the hub. The hub does not need any additional configuration to be aware of the spoke router.
As you can imagine, this scales out really well. A small amount of config and you can have many spokes up and running.
This is extremely useful for quickly provisioning a new office, or providing a backup to your private WAN.
Multipoint GRE
We’ve discussed GRE tunnels before. They’re generally point-to-point tunnels, with or without encryption.
Their problem is scalability. As mentioned earlier, creating many point-to-point tunnels is a lot of work.
Along comes Multipoint-GRE to the rescue!
This is the basis of DMVPN. You can have one (or more) hub routers, with a single tunnel interface, and many spoke routers connected.
The concepts, of course, are the same. Except now, you create a single tunnel, not hundreds (or maybe thousands?).
Well, that sounds good, but how do you get spokes to register themselves with the hub? I’m glad you asked. That’s where NHRP comes in.
Next Hop Resolution Protocol
NHRP is not a new protocol. It’s been around for a long time, being used with NBMA networks like Frame-Relay and ATM.
One of the problems that NBMA networks suffer from is path selection. Left on their own, they may use suboptimal routing.
NHRP addresses this issue by building a network map and finding better paths through the network.
DMVPN may be seen as a type of NBMA network. Tunnels are dynamically built over an underlay network, like the internet. There’s no ARP or anything like that to discover tunnel endpoints, so NHRP becomes very useful.
How NHRP Works
NHRP uses a client/server model. A hub router is the Next Hop Server (NHS). Spoke routers are the Next Hop Clients (NHC).
As we’ve discussed, DMVPN builds multipoint GRE tunnels. Just like regular GRE tunnels, they need IP addresses at either end. These are often public IP’s, as DMVPN is often configured over the internet.
The spoke routers are configured with the public IP address of the hub. The hub, however, has no manual configuration for each spoke.
When a spoke (an NHC) comes online, it sends an NHRP Registration message to the hub (the NHS). The NHS maintains a database with all the NHC public IP addresses.
All NHRP messages are encapsulated in GRE, and sent to the logical tunnel IP Address
And this is why dynamic public IP’s are possible on the spokes. They’re not statically configured on the hub, rather they are learned by the hub when registration occurs.

Once the NHS has a list of the spoke’s real IP’s (called the NBMA IP), it can create a mapping between the NBMA IP’s and the Logical VPN IP’s (the IP’s accessible over the tunnel).
The first advantage of this is that the hub router can dynamically build a tunnel to the spoke.
NHRP Address Resolution
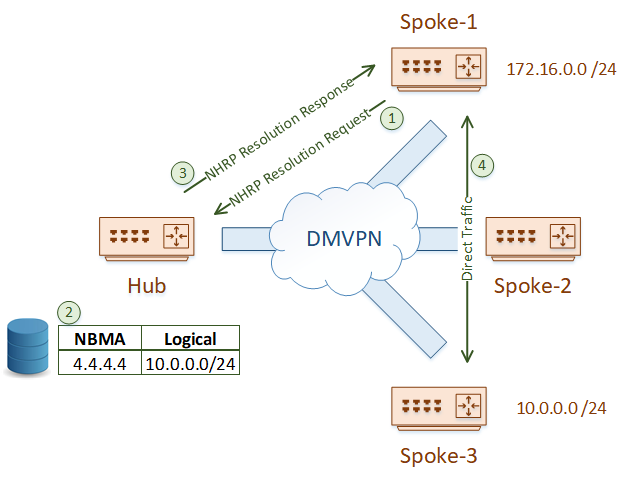
Spokes are not configured with information about any other spokes. They are only configured with hub information.
If Spoke-1 needs to send traffic over the tunnel to spoke-2, it requests this information from the NHS with an NHRP Resolution Request.
The NHS responds with an NHRP Resolution Reply. This message includes the logical VPN IP and the NBMA IP that it maps to.
NHRP provides address resolution in NBMA networks. This is similar to how ARP provides address resolution in Ethernet.
From this, you can probably see that NHRP is a bit like ARP in ethernet. While ARP maps a MAC address to an IP address on a broadcast network, NHRP maps a logical VPN IP to an NBMA IP without the need for broadcast.
DMVPN Phases
We can use DMVPN in three different ways. These are called phases.
This can be a bit misleading. These are not phases like in IPSec. They are also not stages that the tunnels go through.
These are more like version numbers. For example, Phase 2 has different features to phase 1. You’ll see this as we discuss each of the phases.
Phase 1
Phase 1 was the original implementation of DMVPN. It’s based entirely around the hub and spoke model.
Spokes will use NHRP and register with the hub router. The hub router builds an mGRE tunnel to connect to all the spokes. Each spoke builds a regular GRE tunnel, and will only connect to the hub.
Phase 1 DMVPN allows spoke routers to dynamically register with hub routers
Phase 1 was fantastic at the time but has a serious limitation. There is no way for spokes to directly communicate with each other.
If spoke-1 wants to communicate with Spoke-2, traffic needs to flow via the hub.
This causes a few problems. For one, this causes sub-optimal routing. It’s not ideal for all traffic to be routed through the hub.
Also, when traffic arrives at the hub, it needs to be decapsulated. It will then be encapsulated again and sent to the spoke router. This, as well as the extra traffic flowing through the hub site, places a higher demand on the hub router.
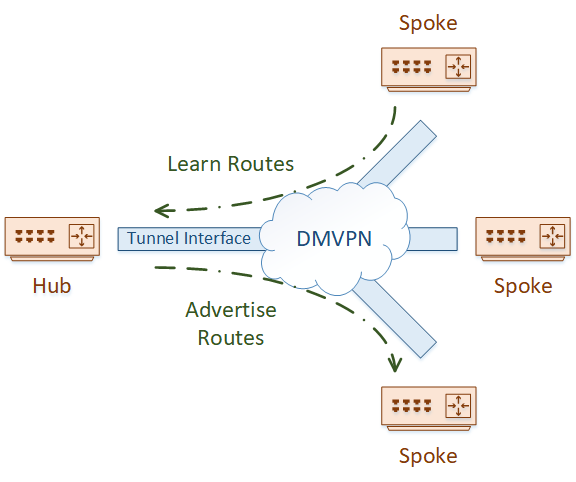
When it comes to routing protocols, we also need to remember split-horizon rules. EIGRP, for example, has a rule that states that routes cannot be advertised out an interface they were learned on.
This is a problem in Phase-1 DMVPN, as the hub has a single tunnel interface. It learns routes from spokes on this interface and needs to advertise them back out the interface to other spokes.
So, for this to work correctly, split-horizon needs to be disabled on this interface.
Phase-1 enforces a hub-and-spoke topology. Optimal routing designs will take this into account, and treat each spoke as a stub, sending only a default route.
This gets tricky with OSPF, as there is a need for the tunnel interface on the hub to be in the backbone area. This results in every spoke (at least their tunnel interface) being in the backbone as well.
Depending on the size of your network, static routing might be appropriate.
Phase 2
The biggest limitation in Phase 1 was the lack of direct communication between spokes. If spokes needed to communicate directly, we were left with suboptimal paths or more static tunnels.
Phase 2 is an improvement on Phase 1. It retains dynamic spoke registration and adds mGRE on the spoke side. This means enables direct communication between spokes.
Phase-2 DMVPN adds mGRE to spoke routers. Spoke routers can now communicate directly without traffic traversing the hub
But how do spokes discover each other? Let’s say that the Spoke-1 router needs to reach the 10.0.0.0 /24 network. The challenge is that Spoke-1 does not know which router this network is behind, and it does not yet know how to use the tunnel to get there.
It starts by sending an NHRP Resolution Request to the hub. The hub looks into its cache of NBMA address mappings and finds the correct entry.
The hub will forward the resolution request to the remote spoke router. This router caches the information in the request, and then sends an NHRP Resolution Response back to the original spoke. The response contains the NBMA address (4.4.4.4) of the destination spoke router.
The spoke now knows the NBMA address of the remote spoke router. It can encapsulate relevant traffic, and send it to 4.4.4.4.
This change in topology really emphasizes the difference between the overlay (the tunnel) and the underlay (the network between the routers).
Why is this significant? With the Phase-2 changes, every spoke router needs to be able to reach the NBMA address of every other spoke router. The best practices that apply to regular GRE tunnels (such as avoiding recursion) apply here too.
There is a significant change in the way routing works in this topology. In Phase-1, the hub router was always the next hop. Now, the next hop may be a spoke router.
This makes summarization difficult, or impossible. Each spoke may have a large routing table.
Phase 3
Phase 3 introduces even more improvements, this time in the way NHRP works.
A limitation of Phase 2 was the size of the routing tables. Phase 3 allows efficient summarization of routes at the hub (like Phase 1 does) while still allowing direct spoke-to-spoke communication (as in Phase 2).
Phase-3 adds efficient route summarization, while still allowing Spoke-to-Spoke communication
A spoke will no longer start with an NHRP Resolution Request. Instead, a spoke will simply start sending traffic to the hub.
That may sound like a step backward, but there’s more to the story. When the hub gets this traffic, it will forward it appropriately. But, it will also look in its NHRP cache, and find that there is a better path.
So, the hub will send the source spoke an NHRP Redirect message. This is similar to ICMP redirect messages.
When the spoke gets the redirect, it will send an NHRP Resolution Request message to the remote spoke. It doesn’t know how to get to the remote spoke yet, so the message goes to the hub first. The hub passes the message on to the remote spoke router.
The destination spoke sends the NHRP Response message directly to the source spoke router. This message includes the prefix that the source spoke needs.
The source spoke takes this prefix, and installs it into its own routing table, with the destination spoke as the next hop. It will also rewrite CEF entries to match. This is called an NHRP Shortcut.
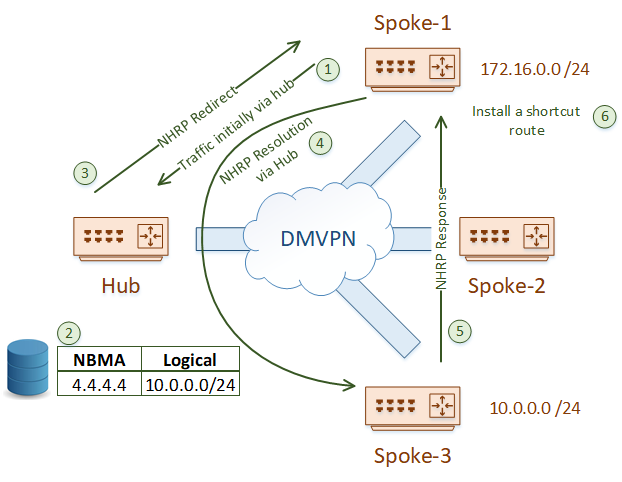
Full routing tables at the spokes are no longer needed. As traffic initially flows through the hub, the hub can pass summarised routes (or a default route) to the spokes. NHRP redirect takes care of the rest.
Phase Summaries
| Phase-1 | Phase-2 | Phase-3 | |
| Key Feature | Spokes dynamically register with the hub | Spokes communicate directly with each other | Allows route summarization |
| Tunnel Type |
Hub: mGRE Spoke: GRE | All use mGRE | All use mGRE |
Enhancing DMVPN
We’ve covered the basic theory of how DMVPN works here. But, there’s a lot more you can do in practice. We’ll briefly mention a few of them here.
You’ve probably thought about redundancy. Isn’t the hub router a single point of failure? Yeah, if you only have one, it is. So, in the real world, you would probably have two or more hubs. Maybe hubs spread across a few sites.
Hierarchical DMVPN is also an option. This is where there is a layer of hub routers, with a layer spokes connecting to them. The spokes are also hub routers, with a layer of spokes connecting to them.
If you’re building tunnels over an insecure network like the internet, you can add IPSec encryption. This is the same as encrypting a GRE tunnel.
As we’ve talked about, dynamic routing is also possible. This could be an IGP like EIGRP or OSPF. BGP is also a great option.
Along with BGP, you can implement VRF-Lite or MPLS (called 2547oDMVPN) for traffic separation.
One surprising application is to extend DMVPN to the public cloud (like Azure, GCP or AWS). These providers support running virtual routers. The CSR1000v can run DMVPN, making this a simple and scalable way to get communications into the cloud.
References
Really a nice, quick and simple explanation! thanks!!
You’re welcome! I’m thinking of making a video on this too